Wednesday 24 February 2021

Building Wagons - 1 - Austrian supply wagon

 The Austrian supply wagon  - build instructions and suggestions.

Firstly, these instructions are intended as a guide and a record of how I built my wagons - please feel free to embellish, alter and improve to get the effect you want.

Secondly, the finish that i am aiming for is enough detail that the viewer can differentiate the wagons from each other, but these are not always going to be super realistic.  They may be a foot or two longer or shorter than in real life, there may be more or less side struts than on the original, etc.  If you want precision, go for 15, 28 or 54mm !

Step 0 - references.  This picture of a HAT 1/72 wagon gave me the rough dimensions and outlines that I was aiming for.


Materials:

.030" white styrene sheet (from the US, metric ~ .75mm)
1 x 1.5mm plastic strip
1/32" brass rod
Plastruct ladder 1/200 N Scale - product no. 90671
10mm plastic tube
0.4mm (0.15") plastic rod

Equipment:

Sharp knife
Tweezers
Triangle file
Emery board
Drill bit & micro drills
Thick superglue
Polystyrene cement
Liquid polystyrene cement

Steps:

1.  Cut a piece of plastic 15 x 6 x .75mm thick.


2. Cut two pieces of 1 x 1.5mm strip, about 19mm long.  These will go under the finished model.


3. Glue at .5mm from edge, allowing at least 1mm on one side and 2mm on the other.


4. Trim the strips to give 1mm at one end (the back) & 2mm at the other (the front).


5. Cut two sections of .75mm sheet into rectangles, 5mm x 13mm.  Glue these on top of each other so that they are flush at the rear with the base and there is a 2mm clear area at the front.


6. Trim/sand the 13 x 5 mm block so that the sides are straight (or slightly lean out would be prototypical) and there is a .5mm ledge at the base on both sides.  I initially tried making a 2-2.5mm box for this part, but had a lot of problems getting it to stick anything like square.  Going for two "slices" and filing the profile was easier.


7.  Your wagon profile should look like this:


8.  Turn the wagon over and file grooves where you want the axle to sit.  The front groove needs to be shallower to compensate for the difference in wheel radius.  Drill out the back of the wheels a little and superglue one wheel onto the brass rod, measure the axle length needed (measure twice!) and trim the axle so that the wheels are just proud of the wagon body - attach the second wheel.  The top wagon (below) has had some stowage glued to the rear and then the luggage rack glued to the stowage and to the 1mm projections at the rear.  Cut the ladder so you get two rungs.


9.  The second wagon, well on the way.  Cut a section from the 10mm plastic tube that is over 11mm x 6mm and trim to fit the top of the wagon, aligned flush with the rear.  There will be a "shelf" at the front.  Add pieces of 4mm rod on the wagon sides, using the ledge to secure them.  I found this very fiddly, so I dipped one end of the rod in superglue (loctite superglue gel) and then, when I had attached all 5 struts, gave it a wash in mecpac liquid glue.  At the top of the picture is a section of the large diameter plastic tube, used for the cover.


10.  Final touches - there is a box on the front of the wagon - a piece of plastic rectangle cut to about 4 x 2 x 2 mm.  I added a couple of 0.4 mm strip as handles.  

Keep the wheels separate, so you can paint the body without them in the way.

So far - wheels "dry-fitted", stowage and front boxes added.  Spare wheel will be added to one wagon.  I added lateral strips to the roof - the original wagon appears to have strips with nails.  


I trust that this gives you the inspiration to have a go.  I certainly got a lot of pleasure from making a complete, reasonably accurate looking model from strip & rod !


Thursday 18 February 2021

Austrian Wagons - battle field adornments.

 One aspect of wargaming that is sometimes overlooked is the large "tail" needed for an army to operate.  

Whilst one could incorporate logistics into the table top battles we play, the logistics tail is most likely to feature in battles either as an objective (steal the enemy supplies) or as a "road block", hindering a retreating army from getting it's "teeth" arms over river crossings or difficult terrain.  

The number of wagons needed is quite considerable - here are some examples - 

Bruce Quarrie's "Napoleon's Campaigns in Miniature" calculates that over 3,500 are needed to move the flour rations for 240,000 men for 25 days.  Plus the wagons for beer, fodder, ammunition, etc.

WJ Rawkins, "The Austro-Hungarian Army 1792-1814 gives a figure of 11 wagons & 26 pack horses as the official allocation for an infantry regiment.  Actual numbers would be considerably more, as Austrian Officers were definitely interested in "glamping" rather than "camping".

Without further introduction, here are the models:

Austrian Infantry Ammunition Wagon.  This was modelled on the HAT 1/72 supply wagon - beautifully modelled thus:


Suitably inspired, I made a couple of 6mm versions - Wagon #1:


This needs a pole at the front.  The wheels are from the Baccus Equ01* set.  Stowage was scratch built.  

Wagon #2.  This will have a spare wheel attached to the rear stowage rack - this will be attached once I've painted the model.


Forge wagon.  Every Austrian regiment had a forge wagon allocated.  The Austrian design had the bellows in a compartment at the back, which means if I keep the tilt on, I do not need to model it!

My source material is this excellent large scale model in the Museum of the Battle of Wagram 1809 .  

This volunteer run museum is well worth a trip.  Not only are there loads of historical artefacts, when we visited in 2018 there was an excellent display of scratch built model Austrian military transport AND a huge number of Austrian 1/72 plastic soldiers, arranged in real regiments and battalions in 1:1 scale.

So here are some "eye candy" photos of the forge wagon (thanks to Sarah for excellent photos!):


Here is scratch build progress to date...


The forge still needs the front pole, rear baggage rack & spare wheel, etc.  

*Baccus Equ01.  I bought one of these for use as generic baggage wagons a couple of years ago.  As I needed wagons with different outlines, Peter kindly took back the 4 carts in exchange for 4 x 4 horse teams and 4 sets of wheels.  Lock-down has given me the space to have a bash at getting the wagons I want! (Thanks Peter!)


Finally, for those who are interested, here is where I got the details for my quotes on wagons & logistics...

Napoleon's campaigns in miniature - Bruce Quarrie:

regarding flour rations for the troops:

"...the Imperial Guard Corps in 1812.  They were provided with ... 1,720 wagons for 'ready use", plus... 1,200 comtoises...  ... and a further... ...600 more heavy wagons... which was designed to be adequate for 240,000 men for 25 days."

In addition to the flour wagons, there was wine/beer and fresh meat, which was normally vast herds of sheep & cows.  There were also wagons needed to carry the fodder for the supply wagons.

CB2 - Austro-Hungarian Army - WJ Rawkins:

"in 1789 each infantry regiment had a support train of 14 Proviant wagons, 6 four horse ammunition wagons, a mobile blacksmith and 54 pack horses, PLUS each company had pack horses, mules & carts which carried the cooking utensils, tents, forage and sutler's stores.  The infantry regiment had 534 tents..."

"In 1809 the regimental train was reduced to 10 four horse wagons, 26 pack horses & the field smithy."  In 1807 the tents had been removed from the equipment and troops were expected to billet on the locals at the ratio of 10 men/cottage.

In 1809 the foot artillery had 1 caisson per gun/howitzer and 1 provision wagon per two artillery pieces.  The "cavalry" artillery had fewer ammunition wagons, but had pack mules and forage wagons.


Monday 15 February 2021

Mad as Hatters - Napoleonic Austrian Artillery hat fashions for 1790 - 1815

 The Austrian artillery of 1790-1815 wore a number of different hat styles, which means that as a 6mm modeller using Baccus figures, I will have to do a bit of mix and match....  plus an odd conversion or two, if I want to field an Austrian army from 1790-1814.

As far as I can tell, the correct hats (& suitable Baccus troops, if available) are:

1790 - 1803 Tricorn (later as full dress only) (SYW Austrian artillery).

1795 - 1806 Bicorne - worn "athwart" the head (later as full dress) (French Artillery in Bicorne?).

1790 - 1806 Rundenhat - worn with the rear brim turned up (service dress) (conversion needed).  Has a plume.

1798 - 1815 Corsehut - a style similar to that worn by the Jaegers, with the brim turned up on the left. (service dress) (conversion needed).  Has a plume.

1798 - 1806 Raupenhelm - similar to infantry (Wurtemburg artillery?).

1806 - 1815 Schiffhut - a Bicorne hat worn "fore & aft" (as it was easier to work the guns than the bicorne worn athwart.  (Baccus Napoleonic Artillery).

Obviously all of these changes would take time to implement, so gunners may wear earlier styles and be correctly attired.

To cover all of the Napoleonic period with correctly attired and hatted gunners, the minimum needed are:

1790-1803...1806 Tricorne (1795 onwards parade dress)

1795-1806... Rundenhat (service dress) - these are the ones that I have converted.

1806-1815 Schiffhut

Research - here's a couple of screenshot pictures from the CB-4 Austro Hungarian e-book by WJ Rawkins.  Officers & gunners.  The style is very "rakish"!


Having worked this out, I then had a go at producing a Rundenhat with rear flap.  The Baccus Austrian gunner gives me the body & face I wanted, I just needed to change the hat.  

I sliced the Bicorne* off Austrian artillerymen and replaced with a section of 1.5mm diameter plastruct rod.  Once the hat was firmly super-glued in place it was filed a little to give rounded corners and left to dry.  

I then sliced a very thin section of 2.5mm plastruct rod, whose 1.5mm diameter hole fits neatly over the bit you've already glued.  Before gluing, the 2.5mm "doughnut" was reduced a little with an emery board to a suitable thinness and sliced about 2/3 of the way across.  

This gave a "c" shaped piece to form the horizontal brim and a smaller "d" shaped piece to form the flap at the back of the hat.

Once the hat was dry I gave it a coat of PVA glue before attaching a white metal plume (ex-infantry bayonet!).

All of which accompanied by suitable language as the plastic slid off the figures or glued at an inappropriate angle!

The attached photos shows the "Mark 1" versions of all 4 Baccus Austrian gunners with suitable hats.


I also padded out my gunners by recruiting a couple of spare infantrymen in caskets (the infamous AWL01 "man with bag under right arm" figure).  One chap got his under-arm bag drilled out and a length of staple glued as a crowbar.  The other had the bag converted to a small barrel, but I'm not convinced this has worked out OK, so he may need more work.  Anyway - the possibility of padding out your gun teams with "handlager" exists.

Here's photos of the gunners and handlagers.  


As ever, I hope this inspires you to have a go at making some different uniforms!

* The Bicornes were cut off carefully to preserve both the Bicorne and head - I have plans for the Bicornes!


Saturday 6 February 2021

Napoleonic Austrians 1792-98 - Command Group - MK2 Conversions from AWL02

 Following on from my October post, I have now converted some AWL 02 Loyalist skirmishers into Command group figures.

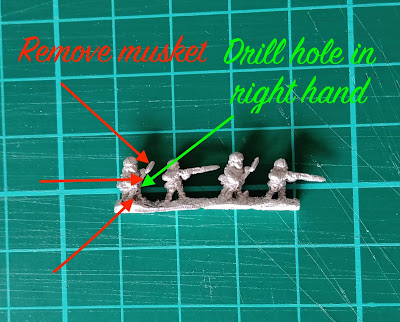
The "loading" skirmisher figure holds his musket diagonally across his body, with his right hand at stomach height and his left hand at neck height.  


The first step is to remove the musket above and below the right hand and the bayonet above the left hand.

The second steps are:

Flag bearer - 

2.1 drill a hole in the right hand and insert a length of 0.4 or 0.5 mm dressmaking pin.  Either don't tell the dressmaker or buy a dedicated supply of pins!

2.2 attach the pin to the left hand and leave about 1 - 2 mm of pin below the right hand (to represent the foot of the flagpole in some sort of carrying belt).


Drummer - 

2.1 attach a drum under the left arm.  I used 2mm diameter plastic rod cut into a 3mm section.  I positioned the drum at an angle to that the hands were just above the top of the drum.

2.2 attach drumsticks to the hands.  I used some very thin wire that was decoration around a wine bottle.

2.3 embellish the drum with straps and a top hoop from the wire.


Fifer - 

2.1 remove the right arm and make a new one from wire.

2.2 attach a short length of staple to make the fife.

2.3 add a plastic fife case under the right arm.


Here's the unpainted figures - 


I plan to post again, once these are painted and based.  I hope this inspires you to have a go at Austrians 1792-98.  

The flag bearer is the easiest of these conversions, so you could just substitute in an officer and make a flag bearer, to get a suitable command group.  Or go mad with knife & glue and make some music!!