Showing posts with label French. Show all posts

Sunday, 20 July 2025

Waterloo at Joy of Six - the AAR

 Just over a week ago I headed south to Sheffield for our Joy of Six game - Waterloo!

The Day

Mike and I set up the terrain and deployed the troops ready for action.  We very quickly got some gamers interested in playing "for a turn or two".  Some of the players were completely new to gaming - others had bought a copy of the rules, had played solo but weren't really confident that they were playing right - what better way to test your understanding than playing one of the most interesting and famous battles in history!

Mike did an excellent job of umpiring whilst I was less involved in the battle, more talking to potential gamers, answering questions and getting involved where needed.

I had forgotten to charge my phone, so my wife did an excellent job of taking photos and ensuring that we were fed and watered throughout the day.  Last year - (click here) she had come to observe, was asked to play and lead the Austrians to a crushing victory! This year she was glad to just observe...

We were really pleased that Chris Pringle, rules author (see here for his blog) had come up North with Mark Smith, who wrote the scenario book we used.  They spent the day circulating between the BBB games on offer and chatting with the gamers.

After a hard fought battle lasting eight turns with continual action from about 10.15 to 16.00, with much rolling of dice and charging of troops, the Allies won.  


Photos:

Early on in the battle - the French (to the left) are advancing.


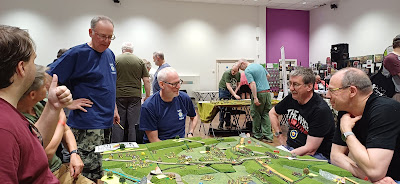
My one usable photo.  Mike, in his brand new "Ilkley Irregulars" t-shirt, umpires the three French on the right taking on the Anglo Dutch defenders on the left.

In the background, other games were available ....


About the same time, the other side of the table.


Thumbs up from Napoleon - our first gamer to join and last to leave the table!


From the French (south) side, later in the game.  Still plenty of action in the middle, Prussians arriving lower right.


Drone shot - East at the top, North to the left.  The Allies on the left defend the ridge as the French take La Haye Sainte and swarm Hougoumont.


Conclusions, thoughts but firstly - THANKS:

1. Venue - Thank you to Peter, Lindy and the Baccus team for an excellent venue, helpful stewards and a great show!  

2. Rules - Thanks to Chris for an excellent set of rules that deliver HQGE - fast moving, absorbing games with most players doing something most of the time.  Thanks to Mark for this, the last scenario in his latest book.  We had some spare copies of the book available on the day and were pleased that these were all successfully re-homed!  Thanks for your support on the day!

3. Umpire - many thanks to Mike for ensuring that players got to have a great time on the day!  A further big thanks for making the terrain (excellent!) which contributed considerably to the visual impact of the game.

4. Players - many thanks to those of you who turned up on the day.  It was great to see you getting stuck in to the battle - played with style, banter and good humour!

Conclusions

It was a really good day and a great opportunity to show how BBB can enable a few mates to play a significant battle in an accessible manner.  Most of the players had just started, but the joy of BBB is that you concentrate on decisions, with a lot of the "admin" being done simply, efficiently and reliably within the rules and dice results.

It's been a lot of fun putting on the game and I'm pleased with the interest that we generated.

Thoughts - resources

There are a number of BBB resources that gamers can access, as follows:

1. Chris's BBB blog gives regular updates on the latest goings on in BBB world. 
2. There's an io.group for BBB - gives free scenarios, AARs, advice, clarifications, etc.
3. For figures and conversions, look at this blog and others.  Personally I really like Baccus 6mm, other manufacturers and ranges are available. 
4. There's a Facebook page here that also has plenty of material to look at and read.

Finally - all in all it was a great day - well worth it.  I guess i need to start thinking about JoS 2026....


Saturday, 21 June 2025

Waterloo at Joy of Six - the second practice game - 30 May, 13 & 20 June

 Having played Waterloo once, in preparation for Joy of Six, we then replayed the battle but swapped sides, with Mike as Napoleon and myself as Wellington and Blucher.  See the AAR for our first battle here

We now had Mike's terrain and some more troops created for the game so battle commenced!

Here's the map, orientated so that it matches the pictures:


As we had recently played Waterloo on the other side, we organised our opponent's troops for them to deploy - here is the French army ready to march North:

The "drone shot"


Guard to the left, D'Erlon's I Corps in the middle


Initial deployment - The thin red line

Here's how it looked from my side - these are my troops on table but not yet deployed.  The orange roads are the sunken roads - they give some cover from cannon fire and in the assault.

The Allied right 


The Allied left


Turn 2

At the start of turn 2 (our second day of play) I had brought my stock of hedges, so I had something substantial to defend (? hide behind!).  Mike sent forward his left hook to take Hougoumont.  I appreciated how skirmishers, devastating fire, being in a fortified manor in a wood improved my chances of survival considerably!  On the right of the picture Mike pushes down the ridge towards my Brunswick & Hanoverian Landwehr...


On the left, Mike headed for Papelotte.  The Guard waited....


Turn 4

By the end of turn 4 we had achieved stalemate on the Allied right.  Mike couldn't take Hougoumont and his left hand flanking manoeuvre had not broken through.  For most of the Allied line it was a case of "hurry up and wait".


In the middle my troops were mainly waiting patiently for the French to arrive, except at Papelotte, where multiple French piled in to take the fortified village.  To the left the first Prussians arrive, whilst the French Guard, static till turn three, fill the gap on Mike's right.  Mike had learned from my earlier slow response to the Prussian threat.  Tired from their yomp through the forest, the Prussians slowly advance...


Turn 6

At this point things were going OK.  Mike still hadn't taken Hougoumont and his left hook had been stopped by various raw units - they had gone spent, but then so had Mike's infantry, so he wasn't't able to break through on his assaults.  Mike had established a gun line just out of musket/canister range of La Haye Sainte and destroyed my unit defending it.  I begin feeding units to my right as I'm not sure if my spent units will hold. 


On my left Mike holds Papelotte, however his main concern is more and more Prussians emerging from the woods.  He builds a defence line consisting entirely of Guard.  His artillery amuses itself by long range counter battery fire, which is why there are two guns in the foreground of the picture.  They will recover and return to the firing line in due course.


Turn 8

On my right I now stretched my line thinly to hold Mike's spent units at bay, whilst the survivors of the two spent units went into the hedge lines to recover.  Mike's assault on Hougoumont had been unsuccessful, so he had pulled back his troops to recover.  He had, however, removed one of my better units from the field of battle.


On my left the Prussians put pressure on the Guard.  At the top of the picture A Prussian column heads down the road towards the French rear, it looks like Mike's flank has been turned.  In the middle Picton assaults Papelotte with everything he can, Mike scrambles to react to this threat... 


Turn 9

We played turn 9 through enough to decide the key combats and determine a winner.  

On the right I advanced my line to support the gallant defenders of Hougoumont.  Mike's final assaults here were not able to break through.


In the middle Mike occupied La Haye Sainte on his turn 9.  I assaulted and won using the whole of my middle troops.  Not even the Grand Battery could save the French defenders.


On the left you see the results of the Prussian massed assault.  The Guard started to take losses, but well placed artillery meant that the Prussian column on the road went spent and moved no further,  The defenders of Papelotte did hold out, but the Prussians had broken through and driven off the French relief force.


Conclusion

I am pleased to report that it was another Allied win.  Mike, as Napoleon, didn't repeat some of my mistakes, however he was not getting high enough die scores to breakthrough at Hougoumont.

It's hard for Napoleon - as Wellington all I had to do for half the game was wait for the French and keep my troops from being blown away.  Mike had to win big against me early on and then win big against the Prussians.

When I did go onto the offensive, at the end of the game, the fragile and raw nature of much of my force showed up in failures to charge home and units quickly going spent.

We both thoroughly enjoyed the game and it's been great to play on our bespoke terrain.

All that remains is to welcome you on the day at Joy of Six on 13th July in Sheffield - you are welcome to take a turn or two or stay longer.


Saturday, 31 May 2025

Waterloo at Joy of Six - the terrain

 Mike has spent the last couple of weeks creating the terrain for Waterloo at Joy of Six, Sunday 13th July in Sheffield.

Here's a sneak preview of the terrain set up yesterday, as we prepared for our second refight of the battle.

It will be nice to have purpose built terrain to fight on!  ðŸ˜€


  We left the gaps to help us work out how the jigsaw goes together.  Looking forward to seeing some of you on the day!

Update - here's the terrain with more features added:

Looking South from Allied position - Hougoumont chateau in the middle, La Haye Sainte farm on the road in the left centre.


Centre of the battlefield - Papelotte village on the left - it counts as a town and is an objective.


The left side - forests and trees to be added


Valmy, 20th September 1792, refought Friday 9 May 2025

 Mike and I fought Valmy last year, as can be seen here.  This time we swapped sides and I was the Prussian army - driving deep into France and heading for Paris, to stamp out all this egalitarian nonsense!  Whatever next?!  Mike was the glorious French - "les blancs et les bleus"* - desperately hoping to stop the invaders with a mix of steady regulars and enthusiastic volunteers.  

The French were aided on the day by dysentry in the Prussian army, so the Prussians all get rated as passive.  At this point the Prussians are the best army in Europe...  so have a reputation for winning to uphold.

Here's the map - orientated the same way as the following photos.


The Prussians need to take the Valmy ridge, two villages and the big hill to the north, the French need to stop them.....

Set up photos:

The right side


The middle:


The left - with the Prussians lined up ready to storm the French


Move 2

By the end of move 2 the Prussians had moved forwards, but the passivity caused by illness meant the attack was unco-ordinated.  Mike took this opportunity to start his long range shooting...


Another view - Mike built a solid line across the ridge and into the village at the bottom of the photo.


There is a photo of the right hand side of the battlefield, but as there are no troops on it, I decided to save space and not include it.

Move 4

By the end of move 4 the Prussian middle had attempted to take the ridge and failed.  The Left hook (top of picture) had gained ground but not fast enough or causing enough French casualties to break through.


At the bottom of the photo you can see the Prussian right hook - moving slowly towards the defended village.


Move 5

Scattered Prussian units show how the left & middle fared.  The Prussians did storm the ridge but in a haphazard sort of way.


At the bottom of the photo you can see the lack of progress as the Prussians still haven't managed to charge the French defending the village.


Move 6

At the end of move 6 the Prussians were running out of options and troops.  The left hook (top of picture) had not worked.  The surge (middle of picture) had finally broken through, however the surviving infantry units were now sporting bright blue counters to show that they were spent.  The Prussians did get their cavalry to charge through the middle and take the village of Valmy.  At the bottom of the picture the right hook had, once again, failed to land.  


Move 7

At the end of the game it was a clear French victory.  The Prussians had not taken Valmy ridge or the hill to the north (top of picture).  The Prussian cavalry failed the French counterattack on Valmy village and were removed from the sole victory objective they had taken.

The whole battle had taken place in the left hand third of the table.  A decisive victory to Mike and the revolution.  


Conclusion

We have played this twice, with the French winning both times.  The passive Prussians and lack of Prussian command & control really plays a part.  

As Prussian I could not get a co-ordinated attack going, arriving at the French line in penny packets and without the odds to get a decisive combat victory.   

Mike used his artillery to good effect, driving my batteries off and causing casualties.  

When I was able to get stuck in to melee, I didn't win big enough to break the French, whose counter attacks caused sufficient casualties for my units to go spent.

Our conclusion was that it's a hard battle for the Prussians to win.  

Having said that, give it a go, see if you can do better with the Prussians than Mike or I.  It's a great game, at 7 turns not too long.  If our efforts are anything to go by, it could easily fit on a 2 x 4 foot table!  The middle and right thirds were hardly touched!

Figures Baccus 6mm, I used Mike's Prussians and Mike used my collection of French Revolutionary figures.....

*If you want to know more about French infantry stands for 1792, look here and also here


Sunday, 4 May 2025

La Rothiére 1st February 1814 - refight Friday 7 March 2025

 The next battle in the BBB scenario book is La Rothiére, 1st February 1814.  Napoleon is now defending France and on French soil.  The Allies, Austrians, Bavarians, Prussians and Russians are seeking to break through the French defences and head for Paris.

Here's the map.  


I took the French army and Mike was the Allies.  The scenario is 7 hour long turns.  There are special rules to cover the terrain (awful - mud everywhere!) and it's hampering effect on movement.  

Set up

Our initial deployments looked like this.  All photos taken from the south (French) side of the map.  Red markers are objectives (victory points).  I expected a tidal wave of Allies & planned a dogged retreat to the bottom right hand corner.


Turn 2 

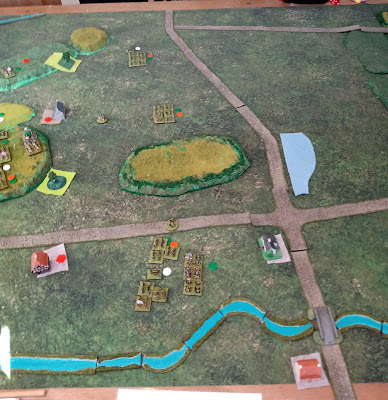
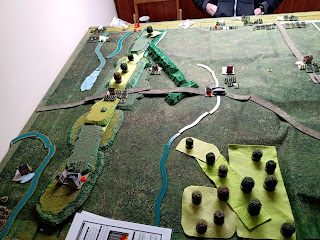
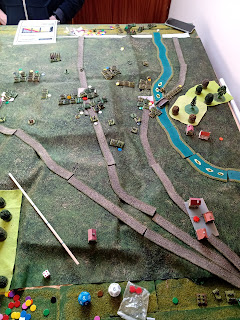
By the end of turn 2, things were still OK for the French.  On the left I held onto the town of Morvilliers (bottom left) as the terrain and stream broke up Mike's Austro/Bavarian V Korps assault.  In the middle of the ridge was a battery backed up by cavalry.

Top left IV Korps moves towards the undefended ridge, seeking to cross it and take the objective village of La Giberie


On the other side of the battlefield, I hold La Rothiére (on the middle road) and the river crossing town of Dienville.  Mike has struggled to move his infantry forward, his artillery need a whole move to deploy, so he's not yet got his guns into action.  At the bottom of the picture the column s my mobile reserves, the block at bottom right can't move till turn 3.


Turn 4

On the left the brave defenders of Morvilliers repel numerous assaults as the difficult terrain and disrupted results hamper Mike's attempts to bring his numbers to bear.  In the top left corner Mike has only just reached the wooded ridge.


In the middle the Allies are moving slowly forward.  The brave defenders of la Rothiére hang on despite being outnumbered.  On the right I still stoutly defend Dienville and control the river crossing.  


Turn 6

The fighting around Morviliers continues, with the town defenders confident enough to form a line holding the ridge supported by artillery.  The Allies have put cavalry in the village, but my French cavalry have faced off against this threat.  Mike's troops swarm La Giberie, amazingly the defenders hang on, despite being massively outnumbered.


Here's the close up of the fight around Morvilliers.....


On the middle and right side of the battle,  the fight went well for the French.  The defenders of La Rothiére were slowly pushed out, but there was no decisive breakthrough.  The French lost Dienville but managed to retake it.  The French denied the river crossing to the Allies.   


Turn 7

On the left the French lost La Giberie as numbers finally worked for Mike.  


At Morvilliers the French defenders broke up repeated Allied assaults and inflicted enough casualties to cause one Allied to go spent, so no more charging across streams and up hills for them!
 

On the right the French held a position just outside La Rothiére and firmly in control of Dienville.  Both sides took casualties (that's spent Frenchmen behind the frontline), however the French didn't break and the Allies started to run out of troops capable of continuing the fight.  


Conclusion

At the close of play I still had 4 objectives - Mike had taken La Giberie and La Rothiére, but this had been a slow process.  Mike had taken Dienville, but the assault unit had then received no support, so was ejected, in turn, from the town. 

I had some really good die rolls and Mike had not had the same die success.  He needed to attack, but this proved a slow business and the artillery need a full move to deploy.  

I had expected to lose Morvilliers, however against my expectations (and Mike's hopes) the defenders managed to repel all boarders.

It's a great scenario, we played it through in a day and I thoroughly recommend it!