Wednesday 29 December 2021

US M5 High speed tractor - model redeemed

 Some while ago I bought a few US M4 high speed tractors from Heroics & Ros.  Whilst most of the castings were OK, one had suffered in the mould and was not going to be "table worthy".  It was bent to the left and the cabin area was only about 2/3 of the required height.


The model nearest the camera is the donor vehicle.  As the running gear was in better condition and height than the bodywork, I decided to create a M5, adding a cabin and reducing the rear deck.  Then it got put in a drawer until this Christmas, when I thought I'd have a go at rescuing it and finishing the model.

Here's the US M4, M5 & M6.


Here's reference photos for the cab.


Suitably armed with a plan, I removed all the bits I did not want and filed down the rear deck and around the sides.


This was then boxed off.


I added the cabin, the rear deck, the rear overhang for the engine radiator, tools, MG mount & cover, front bonnet and fender.  I added the prominent side bars to each side of the running gear.  Sorry, too busy making to photo each stage!


I also bent the legs on a 105mm Howitzer and added a stowage box so the tractor has a load to pull.


Most of my artillery will be truck towed, but as I had the model anyway, I thought I might as well try to make use of it!

As ever, I hope that this inspires you to have a go at making your own.


Friday 24 December 2021

Handley Page O/400 in 1/600

This week I went to the Leeds club (my new local) and played "Chocks Away!" - a WW1 very simple game that I came up with a few years ago for my tiny Tumbling Dice planes.  Suitably inspired by an hour or so's fun, I have started to prepare my remaining HP O/400s for battle.  Here goes....

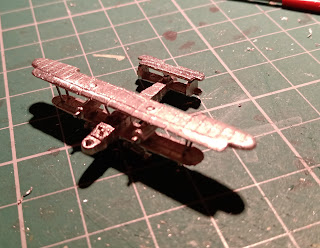
The Tumbling dice kit.  Usually, with Tumbling Dice, you get the plane as one casting, or two if it has non-retractable wheels.  Here you get the body/lower wing, upper wing, 2 x engines, 2 x wheels (+ spare) and a tail.  This is the casting, wire brushed, holes drilled and one central spar added.

I drilled out two holes at the outside of the wings - all the way through the lower wing and a good way into the upper wing, to receive a pair of struts each side.


I drilled 4 holes on the fuselage to accept a bent staple strut, which will provide a secure way of attaching the wing.  One paperclip glued in, one to go....


I glued a strip of plastic on the outer side of the engine to represent the prominent tube radiators.  

I glued the two engines to the lower wing, checking that they are parallel to the fuselage and at the same height above the wing.


Once I attached the top wing to the two engine mountings and the two staple based struts over the fuselage, I turned the plane upside down and threaded staples through to be wing struts.  The plane should be sturdy enough that these additions are cosmetic only.  Doing this from the bottom, into the part-holes previously drilled into the top wing underside means that the trimming and filling is only needed on the bottom of the plane.  

I attached the two sets of wheels and re-inforced these with some off-cuts of plastic to secure the wheels to the plane.  As it will "fly" on a stand, the undercarriage is cosmetic - but I still want it to be sturdy.


The next step was to add the top tail plane at the rear, like this - 


The final step was to add guns.  The HP O/400 had two x Lewis in front of the pilot (ring mount), 1 ventral gun (not modelled - I'm not sure where the hatch even was!) and two guns in the rear dorsal position.  These seem to have been mounted to give cover to 180 degrees but this was done separately, at the corners of the rear dorsal station.   I decided not to model the front guns as they are likely to get broken off - but I may rethink that and add some later.

Guns added:

Finished!  The prominent gaps in the top wing around the engine mounts will be sorted out as part of the painting process.

In real life, the O type bombers were mainly used at night, but as this is just a knock-about simple game, I'm happy to have them operating in daylight.

As ever, I hope this inspires you to get some of these and have a go - they are quite quick to make and very satisfying once completed.

Sunday 12 September 2021

Revolutionary Austrian Chevaux Leger 1792-98

 Here are my photos of the Austrian Chevaux Leger 1792-98 in Green uniforms.  These are Baccus SBR05 British Light Dragoons, with the plume on the hat removed, the hat behind the front plate filed flat (to create a false front), a plume added (repurposed bayonet again).  

The Command Officer, Flag bearer & Trumpeter are Kuirassiers (SAU06) with a paint job.  As half the Chevaux Leger units wore white, a white coated unit will follow in due course.

Here they are!


Napoleonic Austrians 1792-98 - Command Group - MK2 Conversions from AWL02 - FINISHED !

 I posted earlier about the "Mk 2" Austrian Command conversions of the Baccus AWL02 Loyalist skirmisher loading figure into drummers and flag bearers.  Austrian command figures 1792-98 Mk2 - part 1

I attach photos of the finished command bases, now that they are "game ready".  I'm really quite pleased with them, not too hard to make and no head swaps to worry about.  

I am going to make more for raw unit commands (no flag, flautist instead) and trained (with flag) commanded by an officer in a tricorne.

Once again, I hope this inspires you to make some of these conversions.  


French Elite Light infantry - Tirailleurs Corse & Po 1809

 As part of the Danube 1809 campaign I need two light infantry units - the Tirailleurs Corse & Tirailleurs du Po.  It would appear that the Tirailleurs Corse were uniformed as normal French light infantry, with a side plumed shako and their cartridge box on a waist belt, not a shoulder belt.  

There is a debate on the internet about the uniform, so this unit is often portrayed as wearing a brown uniform.  The balance of the argument is for blue, so that's what I went with.

The Tirailleurs du Po wore white waistcoats with red lapels, bicorne hats with a red "droopy" plume.  That's what I went with!

The flags were sourced on the internet, manipulated using excel and word then printed.

OK, here they are:


Italian Army update - Guard Horse Artillery

Just added Italian Guard Horse Artillery to the Army of Italy page...


Saturday 11 September 2021

Mad as Hatters 2 - French Revolutionary period Austrian Artillery

As part of my Austrian Army of 1792-8, I converted some artillerymen by scratch building Corsehats for them, worn with the upturned brim to the rear.

This is what they look like, now they have been varnished, based & flocked.  Note that most Austrian gunners were rated as NCOs, so got attractive yellow hat lace.  Also note that for this period extra labour was drafted in from whatever infantry units were nearby, hence various white coated figures dotted about. 

As the artillery starts the period with gunners in tricornes, so some of my guns will have gunners in tricornes as well.

Enjoy!


As usual, I hope that this encourages you to have a go!

Austrian Jaegers & Lutscher Freiwillige-Corps 1792-98

 As part of the "Revolutionary Wars Austrian Army" project, I need some skirmishers and light infantry.  The Austrian army didn't really get on board with the light infantry concept so this role was assigned to the Jaegers & Frei-corps from 1792-98.  

For BBB I need some skirmisher bases, so here are Jaegers in Kasket and Lutticher Freiwillige-Corps - both suitable for 1792-98, when the Kasket was replaced by the Raupenhelm (crested helmet) and the Frei-corps were mainly disbanded.

I used WJ Rawkins e-book for the Jaeger uniform details and the "History & Uniforms" web magazine No.9 for the Frei-corps uniform - see below.

The troops are Baccus 6mm AWL02 Loyalist skirmishers from the AWI - a nice range of troops - some of which are in Kaskets!  Based on 1" square mdf suitable for BBB rules.  The Frei-corps got plumes (re-cycled bayonets) which add a splash of colour to an otherwise dull uniform.

The soldiers with a white edge to the front of their Kaskets are NCOs.

The models:


Uniform reference for the Frei-corps (see source above):


Copyright: History & Uniforms" web magazine No.9


French Light Infantry in side plumes

 Last year I got locked down with a number of small modelling projects, one of which was to make French light infantry with side plumes, not front plumes, on their shakos.  For reference I used the Osprey "Napoleon's Light Infantry".  

As these are 6mm Baccus troops, based for BBB, I could use a little licence and found suitable regiments to base the units upon.

I went for yellow over green and yellow over red plumes.  I also made two bases for each unit, one in full dress and one in greatcoats.  

It was a time consuming job to file a groove in the side of each shako and add a plume - in this case a bayonet repurposed.  However, with no tv and on my own, I had a lot of time to spare....  The front plumes were, of course, removed.  

So, on with the pictures:


You will need:
Baccus French light infantry, Warbases 1" square 2mm mdf bases, a little amount of time and a bit of patience....


Building Wagons 3 - Austrian supply wagons 3

 After a hiatus caused by job searches, new job induction and many rainy days, I have finally got my wagons based, varnished & flocked.  Based on 1" x 1.5" 2mm mdf bases.  So, here's the eye candy:

1. Supply wagon, no spare wheel.


2. Supply wagon, spare wheel.


3. Mobile Forge.  Horses led by the "man holding a barrel" from Baccus AWL01 - sporting a leather work apron, a receding hairline and a waistcoat (hot work, being a smith!).


Some group shots:


Finally, what an Austrian supply convoy might look like...  heading for the bridges and towns to just, well...,  get in the way (as usual).


I trust that this inspires you to have a go at making your own.  I'm really pleased with the results!