Sunday 12 May 2024

More troops roll off the Lead pile - French Carabiniers 1810 - 1815 and Empress Dragoons

Some more of my troops have escaped the lead pile - in this case French Carabiniers in helmets and French Empress Dragoons.  Both are nice, colourful units and both were conversions of a minimal sort.

Firstly the Carabiniers.  Way back in about 1980, a friend and I visited his local model shop.  There was a war-game set up with 25mm figures and the Carabiners caught my eye.  Black horses, white uniforms, buckets of shiny brass, red crested helmets!

So, here's my unit:


How are these conversions? you ask.  Well, they are not Baccus Carabiniers, which you can, of course, buy.  These are actually Russian 1803-1808 dragoons (NRU9).  I've used these figures for Saxon heavy cavalry as well.  IMHO the crested helmets are really great.  I may actually paint some as Russian Dragoons!


Second on this post and second French Guard Cavalry unit - the Empress dragoons.  Easy conversion - take a "bog-standard" dragoon and fix a plume on the side of the helmet.  Plumes being sourced as snipped off bayonets.  The rest of the conversion is a paint job.


As ever I hope that this inspires you to have a go at painting different units to put on your battlefields.  Figures Baccus, flags sourced on the internet.


Lancelot - or Lancers 4 ways and counting...

 I thought I would put up some of my Baccus French Guard Lancers (NFR36) showing some alternative colour schemes to that in the catalogue.

These figures are modelled in full charge mode - galloping towards the enemy with their lances levelled, pennants flapping in the wind.  I would not want to be on the receiving end of that!

Here's the troops from the catalogue:


As you can see, you get a lancer (with lance, obvs...), an officer and a bugler.  Sadly no standard bearer, but this is where you re-purpose a French chasseur a cheval trooper.  

To do this I added card shapes to make a shabraque, gave him a drastic lobotomy about half way up the shako and added a square of plastic card, set diagonally on his head.  This was then filed to make the card and shako blend and some teeny cords were added (wire from a bottle of wine that had a net on the top of the neck.  (Ooh posh! I hear you cry!)).  File off his sword (you already lost part of that when you sliced his shako) and add a wire flagpole in his right hand.  Careful painting will help him blend in to the rest of the unit.


Firstly, here's my go at Dutch Lancers of the Guard.  My uniform source was L&F Funcken supplemented by pinterest.  French lancers were created after the 1809 Austrian campaign, so I went with an 1812 flag (found on a flag website for free). 


A note of caution - when I first got this pack of figures I tried converting a lance holder into flag bearer (rather than repurposing a chasseur).  I used a dremel tool to try removing the lance, but the vibrations snapped the legs, so went with converting the chasseur.


I am also assembling troops for the Peninsular campaign and decided some Vistula Legion troops would look good, especially as they have bright yellow facings.  Here's how these turned out:


 Flag I sourced on the internet.


I also used these figures for Austrian lancers, which were used throughout the Revolutionary and Napoleonic wars.  The Czapka was slightly smaller at the start of the wars, but Hey!  this is 6mm!  it's really not a problem.

The two completed stands here will be joined by a third, once I get round to painting them...


They make for a vivid splash of colour and look suitably aggressive. 

I trust that this inspires you to have a go.  Most of the conversion work is in the uniform and shabraque colours - you don't have to make standard bearers if you don't want/need to.

Future plans are Polish Lancers of the French Guard, Lancers of Berg and I think I will still have enough remaining for at least one more unit.


Sunday 28 April 2024

Battle of Vittoria - 21 June 1813 - refight 17 Feb 2024

 A trip to Oxford in February was the excuse Mark S needed to gather the players for Vittoria, 21st June 1813.  Mark and I took command of the French, Chris and Crispin took the Brits.  

The British objective was to take key villages and the heights of Puebla, several river crossings and stop the French evacuating their baggage.  The French had to hold on long enough for the baggage to get away and generally slow the Brits down.
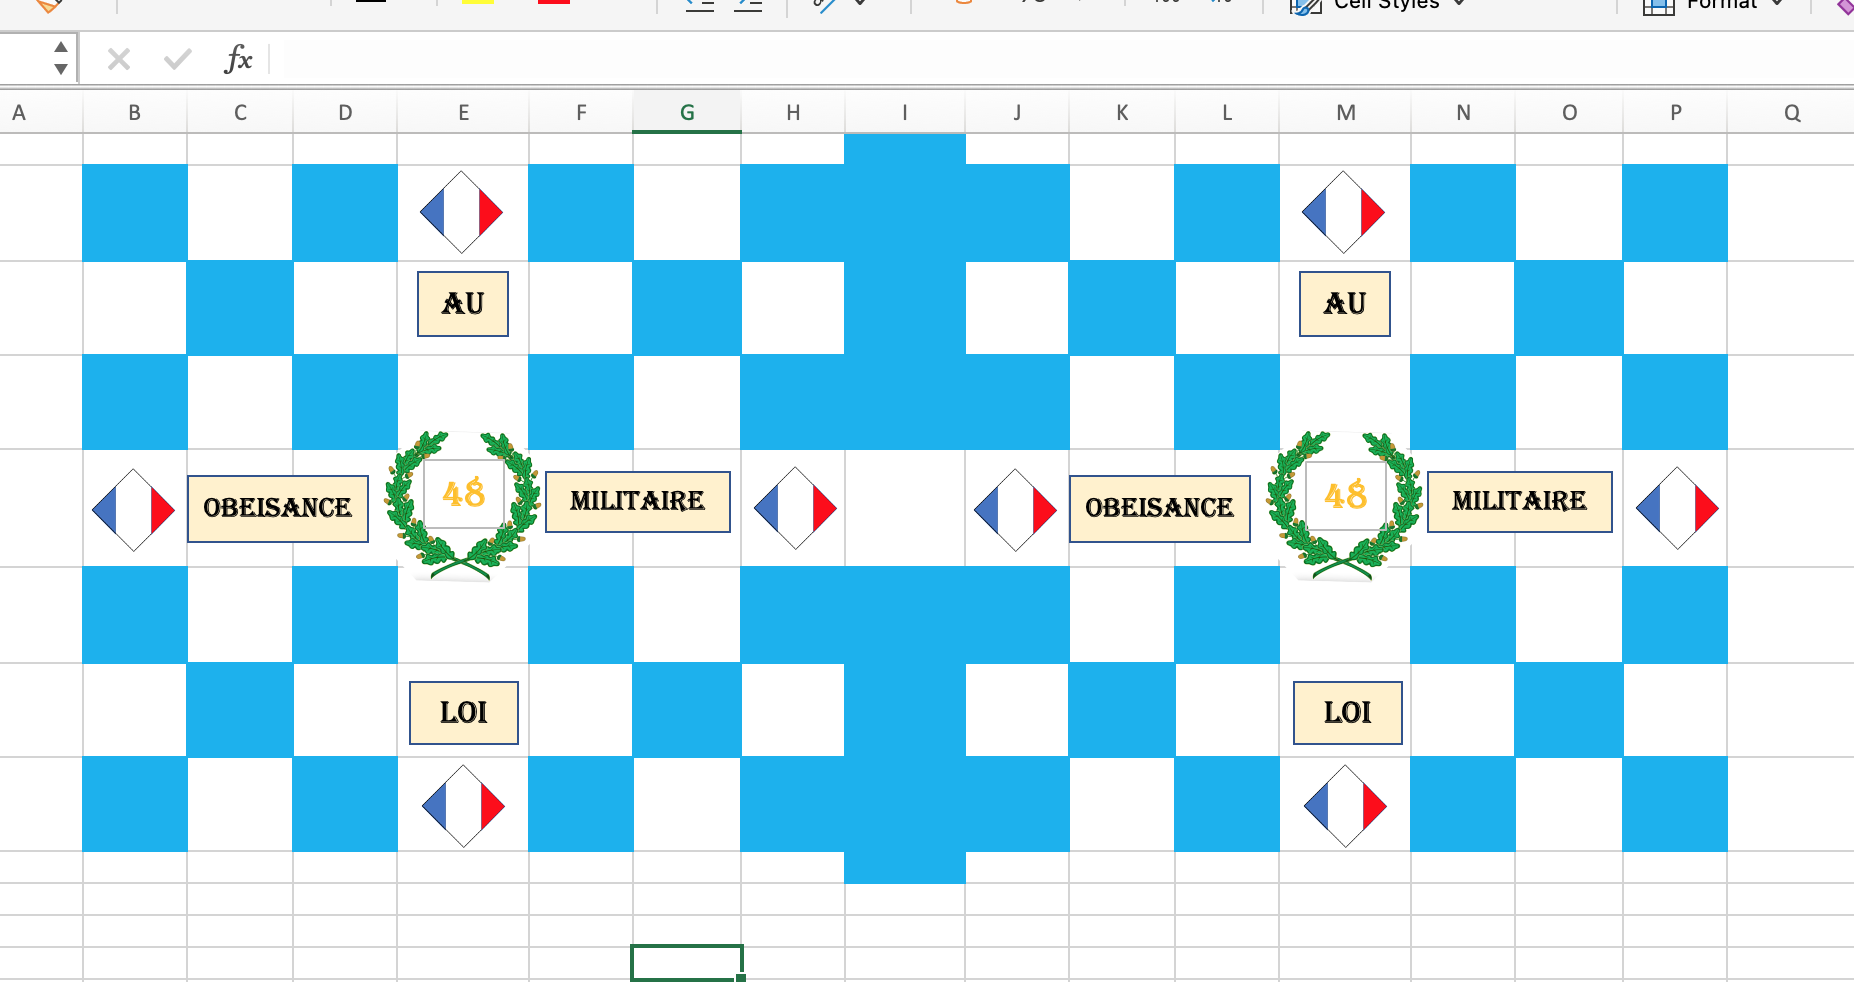
Here's the map.  

I took the French at the top of the map against Chris' forces, Mark's forces were to take on Crispin's two columns coming from the North.  

This was the battlefield as set up - my job was to hold the heights of Pueblo and the hill top middle.  Mark was in charge of stopping the river crossings and guarding the baggage.

Here's our deployment:

French South - bit of a grainy photo


French South West - French my troops facing Chris's Brits in the foreground 


The French South west looking North - Mark is contemplating Crispin's Brits arrival on the board edge in front of him.


The French defending the North Middle - yup, I can't see them either - must be camouflaged!  Actually, I think that they were held till the approaching British trigger movement.

The French defending the North East


Turns 1 - 4 saw the British, Portuguese & Spaniards deploy more and more troops.  Move 5 pics - Chris (in the foreground) sent his light division (I think I saw Sharpe there) into the woods and started sniping.


Same part of the game, looking at 90 degrees to above pic - Chris pushes onto the hill.


One move later....

Chris forms a formidable line and grinds down my French


The battle on the hill goes slowly for Chris as I stubbornly resist, whilst going slowly backwards....


Crispin's advance goes well, with too few French to defend all the river crossings.  The French column in the foreground rushes to shore up the line.


Turn 7

My French continue to battle for the hill.


In the middle, Chris's Brits, loads of skirmishers and Heavy Cavalry support in attendance, charge me off the objective hill and then repel my attempts to retake it.


In the middle, the Brits cross the river and head for the baggage.


Turn 8

By turn 8 the French baggage train has left at high speed (with the payroll) and the British surge everywhere.


My northern French (or ate least the remnant) are now cut off, but continue to battle on.


As ever it was a great game.  In the end the British destroyed the French, but in game terms did not get enough objectives to win.  The French also managed to rescue the baggage and payroll, so the surviving French will all get a pay-rise.  

My thanks go to Mark for arranging the game and being an excellent comrade in arms, to Chris & Crispin for a fun day's fighting.

BBB, as ever, worked well in that we handled this big battle without too much brain strain!

Well worth a replay at some point..... 


Saturday 27 April 2024

French Revolutionary War - French infantry stands for BBB

A little while ago I got the idea that I could create French line infantry stands with flag for use with BBB rules.

I searched high and low on the internet but could not find any 1/300 French infantry in Tarleton helmets that I could use, so I repurposed Baccus Spanish skirmishers by creating drummers and flag bearers from the "loading" figures.  The front rank is firing and the second rank loading, drumming, flag waving or leading.  I have taken a British horse artillery officer (leader figure in Tarleton) as an officer on one stand.

I plan to add some figures in bicornes, as well as those in tarletan helmets, to mix it up a little on future bases.

I created the flags in excel and then printed my own sheet.  By choosing regiments that had easy to reproduce geometric shapes, these were easy to knock up (why make life harder??!).  

Here are the pics of the first two units:


The facing colour over white plumes really "pop"


Here are the units in the classic "ordre mixte"


Here is the top of the sheet I created for the flags:

Here is the master flag - the hoist part of the flag is sized to go round a 0.5mm pole in 6mm, which is why it's a bit wide...   This gives you an idea of the teeny tiny detail on there.


So, there's more of these bases in the pipeline - and I readily admit that I really like these colourful additions to my FRW French army.

Just in case this inspires you to have a go, the figures are Baccus NSP19 Skirmishers in Tarleton, with a RHA Officer thrown in.  

Contact me if you'd like a copy of the flag sheet as a word document.  I've done 2 flags x 3 sizes, enough to test fit on models and make the occasional mistake.

Enjoy!

Wednesday 6 March 2024

Last game in 2023 - Mandara 13 March 1801 (part 2 of Aboukir & Mandara)

 I outlined the start of the British invasion of Egypt in 1801 in my previous post, which you can see here.

This post covers the battle of Mandara, as the British push on to the Egyptian capital of Alexandria.  

Firstly, here's the map again:

The game uses the top 4 rows of squares, with the British deployed in three columns, needing to cross the difficult terrain and drive the French from the ridge.  If the British took casualties at Aboukir (as I did) you can recover some of these (as I didn't) when you deploy your troops for the start.

Starting positions - the British all deploy in column.  Orange cubes = devastating volleys - some British troops were ex-militia, so not as great at firing as the regulars (thus don't get the devastating volley bonus). 


In the middle of the picture you can see the British guards (green cube = aggressive, blue cube = spent, orange cube = devastating volleys).  This unit had suffered in the landing and taken 66% casualties, this did affect the British in the second game as this was the best unit.


The British slowly move forward.  The disordering terrain meant that it took forever to close with the French and start to deploy into line.  The British only have 5 turns to take the objectives, 4 turns if they had taken an extra turn at Aboukir.


The battle was then in two halves.  The British left struggled to deploy and then assault the French right on the ridge.


The British right managed to close with the French left in the ruins, but the French inflicted enough shots to disrupt the British and slow the assault.


General view at turn three/four - British advances on the right not matched on the left.


A view of the British rear, showing units that had to retreat and recover from the left hand assault.


The battle ended in a draw, the British took the ruins, but failed to take the ridge or clear the road to Alexandria.  


Conclusion

This was a really fun game, two medium sized battles setting different problems for both sides.  The British out-number the French 2:1, but need to be aggressive if they are to take objectives in the given time.  The British keenly felt the losses taken by the Guards brigade, who were their biggest and best unit.

Highly recommended and many thanks to Mark for a diverting couple of hours!