Showing posts with label Wargaming. Show all posts

Monday, 15 June 2026

Borodino for Joy of Six - Defences & Houses

 In just under two weeks time Mike and I will be hosting Borodino 1812 as a participation game at Joy of Six.  I needed to make some defences and some houses - here's how I did it, I hope it encourages you to have a go yourself!


The defences - these consisted of the redoubt and the big and little fleches.  These were very recent earthworks, so needed to be mainly soil with reinforcing timber.  I have some mdf trench sections, so I used these for the timber reinforcement and built up the terrain using lengths of lolly stick, suitably cut to size!

The formers:


Note gun ports cut once formers are finished


Redoubt to the left, Fleches to the right


A close up of the Fleches former


This is what they look like when polyfilla has been applied, followed by covering in basing sand, painted and highlighted with earth colours.  Even tough it was summer I reckon the earth would still be dark.


Here are the finished articles - matt varnished and flocked.  


The Houses Pendraken produce a very nice 6mm Russian Church, so I needed 8 more houses to be able to fight the two Russian scenarios in the Napoleon's Bloody Big Battles Scenario book.  This is the basic shape for a 1 storey building.


The next step is to clad the building in logs - in this case 0.4 mm round plastic strip.  Half way through the process I switched to 0.4mm half round strip.  The roofs got strip as well.  All of the buildings have a 2mm strip of stone to simulate the base that the building sits on.


They got a blast of primer and then a coat of acrylic black.  The church is from Pendraken and is also a simple wooden building.


Here's what they look like finished, basically lighter and lighter shades of grey to get that weathered silver timber look.


The most painstaking bit is the creation of the log walls, which need individual strips gluing on, but it doesn't take too long per house.


Thursday, 2 April 2026

ACW interlude - Antietam 17th September 1862 refought 27th March 2026

 Mike and I were joined by Charlie last Friday for the battle of Antietam.  The Confederates are dug in around the town of Sharpsburg.  The Union forces surround them but are rated as passive and have no Generals.  In BBB terms this is a bit of a handicap, as units didn't quite get enough on the die roll to move swiftly, the Union made either half moves or, in the case of some of my units, no move at all....

Move 0 - Set up 

Sharpsburg is the town centre left, with the Confederates dug in.  Mike's troops were held until turn 3, so I was going to give a right hook into that nice big gap.  My troops were an interesting bunch, with some aggressive musket troops (green counters) and some fragile (orange counters).  The musket troops got a bonus on their first shot, so I needed to make that really count.


Move 2

Mike still can't move his troops, mine are getting strung out as two units didn't move at all and the others were a little haphazard.  Charlie thoughtfully filled the gap with dismounted troopers and a back up unit.  On the hill to the right I formed a gun line....


Move 4

At this point, on the US right, I was struggling.  Charlie's troopers in the woods proved a tough nut to crack, I continued to roll low for movement and could not get those aggressive musketeers into range for that devastating blow.  I then tried to move the gun line as I had run out of targets.  Passive applies to gunners too, so this also straggled...


Meanwhile Mike pushed across the creek and headed for Sharpsburg.


Move 6

On the Union left Mike stormed across the bridge and started a series of assaults against Charlie's left on the hills blocking the road to Sharpsburg.  In the middle Mike pushed the Confederates out of their defences and off the hill.  

I eventually cleared the wood full of dismounted troopers, but my troops were still slow to move, so my assaults were piecemeal.  Charlie then retreated to behind fresh troops and a nice defensive gun line - one of my infantry units evaporated....   I still hadn't used the aggressive musketeers and now the enemy had gone out of range!


Move 8

By move 8 my troops had taken the woods, but now a nice clear space separated them from Charlie's gun line.  Not going to cross that, no siree bob....


Mike had fought a ding-dong battle over the hill but Charlie held him at bay.  The Union losses had piled up and Mike and I were not able to continue the assault.  We had enough Victory Points to declare a draw.


Final Thoughts 

ACW battles are more complex, in that troops can be armed with different shoulder arms and so range is an issue.  My best troops had a 3" range, so Charlie's 9" range troops could stop or slow down my advances.

I waited too long to use my devastating bonus, so one unit never actually fired a shot.

The Confederates had Generals and we had passive troops.  The boys in blue had motivational problems, so Charlie could retreat faster than we could follow.  One of my units (the tortoise brigade?) didn't move for 3 turns and then failed to move every other turn.  This ensured they all got medals without actually getting involved at all....

Well done Charlie for making good use of the terrain and troops to slow us down and spoil our attacks....

So, if you want an interesting battle, don the blue and grey, break out the starry flags and give it a go. 

Thursday, 27 March 2025

Dresden - 26 & 27 August 1813, refight Friday 17 & 24 January 2025

 The battle of Dresden, 26 & 27 August 1813, is the next scenario that Mike and I have tackled from Dr Mark Smith's "Napoleon's Bloody Big Battles" scenario book.  I had played it once before, a number of years ago, as French and really not done well.  This was Mike's first go at the scenario.

Mark has introduced some interesting elements to this scenario - the French have fortified redoubts to occupy, with half a gun in each.  The incessant rain on the first day of the battle means that the river that splits the French right/Austrian left area of operations becomes impassible, so on the French right flank it is about holding/dominating the two bridging points.

I chose French, Mike opted to be the Austro/Prussian/Russian coalition.
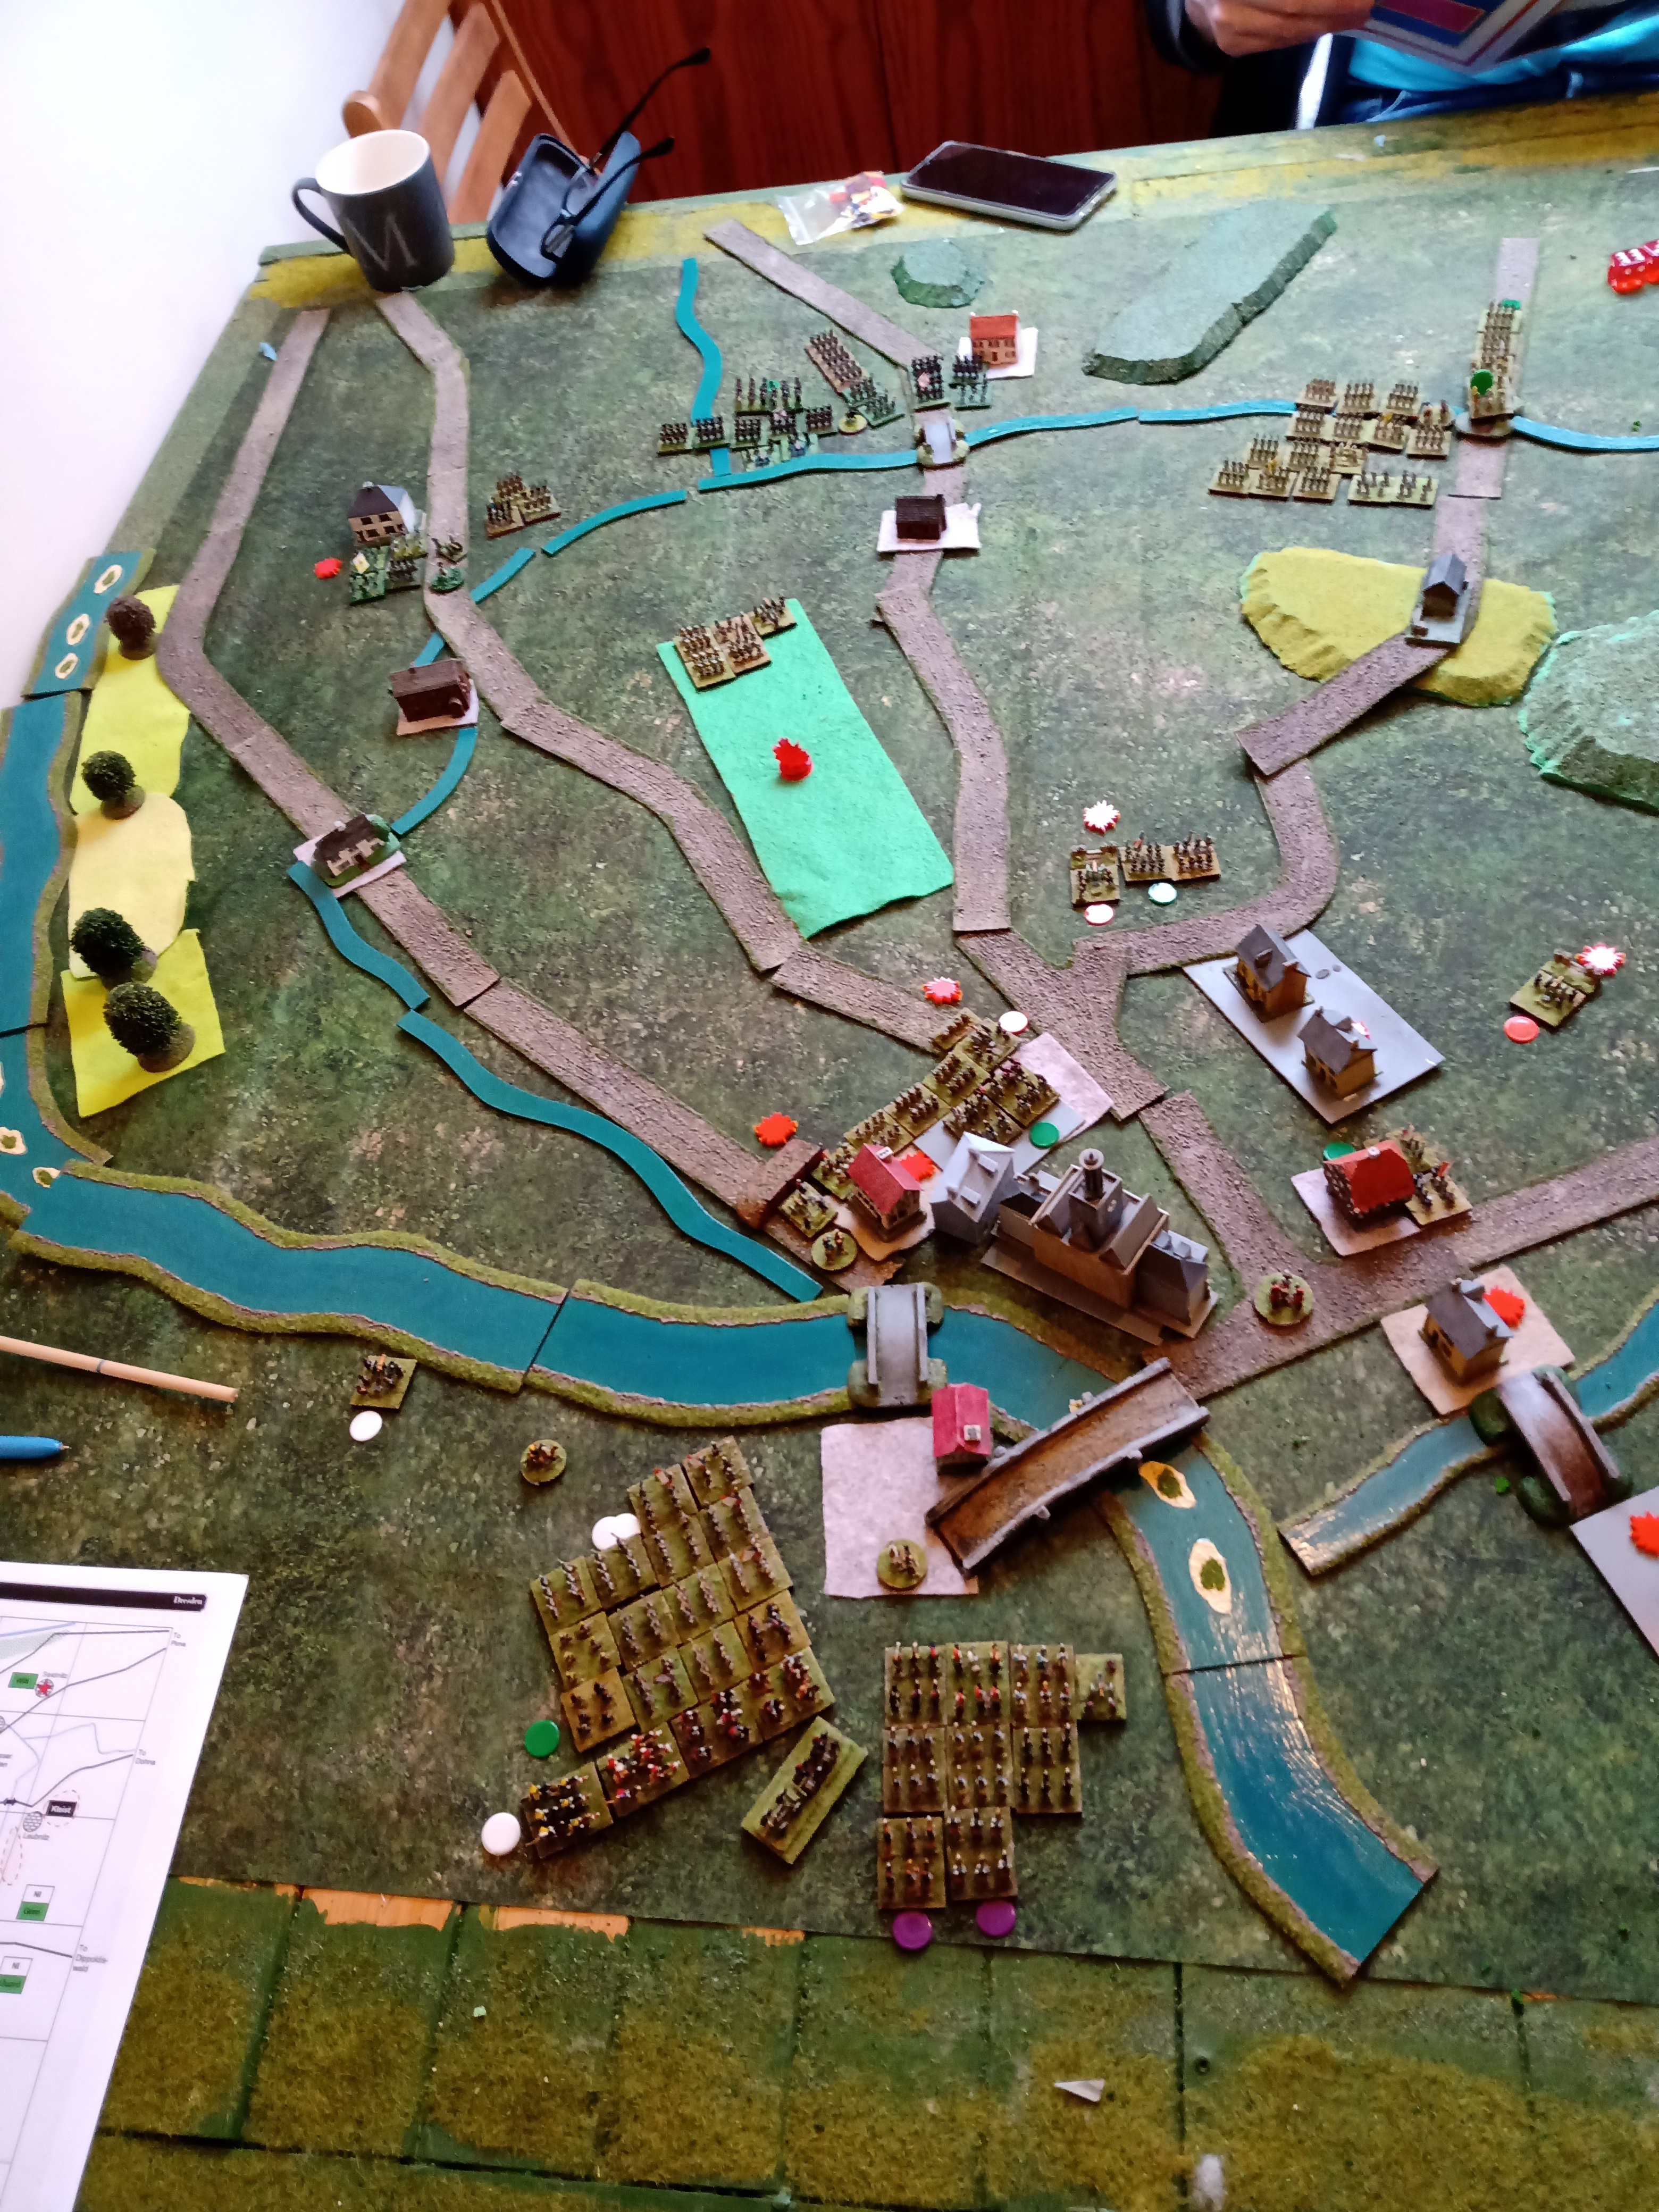
The map:


Set up

The whole battlefield - the Elbe is the wide river, lower left.  The Weisseritz is the medium sized river, this is impassible on day 2 and only has two crossing points.  The bright green rectangle is the Gross Garten.  Shedloads of French troops wait to be released into Dresden from the Eastern bank.


The French left, Dresden and it's suburbs lower left, a thin cordon of defenders in the redoubts.  I deployed a 4 block unit and gun as far forward as possible as a "speed bump".


The French right - a couple of redoubts, otherwise just empty of my defenders!


Turn 2

At the end of turn two the French have re-inforced Dresden.  More re-inforcements wait to cross into the city.

The French left wing, with French troops in the Gross Garten buying time.


The French middle - holding off the Russians in the centre, but only just.


The French right - the Austrian advance has stalled and i diverted my reserves here.  Mike has already had one unit go spent.


Dresden city hall - actually it's for a Franco Prussian game, but it gives a bit of grandeur!


Turn 4

By turn 4 the battle was shaping well for the French as night fell at the end of day 1.  On the left, Dresden is a solid wall of French defenders and Mike halts outside the city limits.


In the middle Mike did take a redoubt, but the French & Allies are now racing to put troops on the hill.


On the right, Mike took up defensive positions, whilst my French controlled both river crossings.


Turn 6

At the end of turn 6, two turns after the night interval, the battle was going well for the French.  On the left the city was well defended, mainly by the Young Guard.  For some reason the Old Guard infantry kept failing their movement rolls!


In the middle a to and fro battle developed for possession of the hill, with both sides attacking and then getting repulsed.  This is where I channelled my reserves and aggressive/killer best troops.


On the right the Austrians could only hold on, so both sides did not do much fighting.  The Austrians started to direct their attention to the upstream bridge.


Turn 8

By the end of turn 8 the French left had advanced to take on the Allied right and was regaining the Gross Garten, putting pressure on the Allied middle and trying to retake the hill.


The French right held the Austrian left and blocked the Allied advance on the upstream bridge.


Turn 9

At the end of turn 9 the French had won a decisive victory.  On the left, they were catching and destroying the retreating Allies.  Dresden is now empty of French defenders!


In the middle the battle for the hill continued as the Allies clung on.


On the right the Austrian left held on, but the troops trying to take the upstream bridge had broken and retreated with heavy losses.


Game end

In this game everything had gone well for the French.  The Austrians had low movement rolls and had not taken any redoubts or suburbs early on.  The French "roadblock" unit in the Gross Garten was destroyed, but contributed to the Allied right's slow progress.  

The French re-inforcements deployed quickly and the French right did really well, stopping the Austrian left and inflicting enough casualties early on to stop the Austrians and make them go defensive.

This secure right flank enabled the French to concentrate on the middle and left sectors, where French quality and quantity stopped the Austrians then drove them back.  The French were able to keep moving and ensure that reserves were fed into the weak-spots in the line.  The battle for the central hill was a real to and fro affair, but by the end of the game this position was in danger of being outflanked.

It was a really enjoyable game, my thanks to Mike as a worthy opponent.