Saturday, 26 February 2022

Diamond T wrecker - converting a tank transporter into a recovery truck - part 1

 I have always really liked the Diamond T wrecker and wanted to convert the Heroics & Ros Diamond T tank transporter tractor unit.  Here is a wrecker parked outside the musee de la liberation in Normany - picture culled from the internet.


This project was another one resurrected from the "in progress" pile at Christmas,  as explained in my earlier post M5 High speed tractor

On with the build!

I had already removed a lot of the rear deck, leaving two wedge shaped sides and the rear box behind the spare wheel.


Here's the original tractor compared to the cut down version (which has been wire brushed, hence shininess).


I bent a staple to make an A-frame from beside the spare wheel to the cab top.


I added at staple to make a frame either side of the generator between the cab and wheel.  Two pieces of .4mm rod to make the acetylene & oxygen tanks.


I tend added two strips of plastic to anchor the rear deck extension.  The strips are the side lockers.


Rear deck added and lockers trimmed to size.

I added a tailgate.


The wrecker has a winch at the front and the bumper has a raised section.  I filed the bottom of the bumper away at the radiator area and added a strip on top to make this feature.


I also added rear mud flaps to tidy up the rear area.  No, you probably won't see much of them...  ðŸ˜€


Here is the rear deck finished.  I added locker lids to the lockers and a plastic carved top to the cab to represent the canvas tilt.  


At this point I'll review the changes to date....


It looks like it can handle rescuing anything....   it also is now definitely different to the original model.

Saturday, 12 February 2022

Montebello - BBB "training" game

 On wednesday evening i played my first BBB game in the real world this year - Montebello (20 May 1859, French & Italians v. Austrians).  The small number of models needed, simple terrain and asymmetric forces involved makes it a good starter game, though it is by no means simple or easy.  

Large numbers of not very good Austrians are held up by a smaller force of very good French.  

As this was a week day at the club and we only had two players, the photos are not part of a detailed AAR, more they give a flavour of the game.

I provided my 1809 French & Austrians as i do not have troops for this war, but at least the colours are about right.

Mike had never played before, but got into the swing of things and used his better class, fewer troops to bottle my forces up.  The scenario gives him 3 Generals, useful to positively influence die rolls, whereas I had passive troops, some fragile and no generals at all.

In the end it came down to the final turn of 7, with both of us needing to storm a village for a win, which neither of us did!  Classic BBB !

Pictures from the game...

Austrians slowly deploy, having already had one unit become spent & low on ammo...


The first use of one of my new bridges - see previous blogs - Bridges 1    Bridges 2 


Later in the game, Austrians mass for the charge, but passivity, a lack of generals and low dice, plus French firepower, will slow them down.


The map - the battle can be fought on a table as small as 4' x 4'.  


Battlefield Accoutrements - Bridges 2

 Over Christmas I finished off most of my bridges, as described earlier in this post - Bridges 1 and got them table ready.  I've added some rivers and troops for effect:

1.  Bridge in good condition.


Napoleon views his troops as they cross the river.


The same scene with a "hasty bridge" - created by your engineers and sappers from whatever was to hand....  handy for crossing the Berezina!


Finally, retreating armies often burnt bridges in order to cover their retreat.  So here is a suitably burnt bridge!  


 The troops are Baccus 6mm on 1" square Warbases 2mm mdf.  The river sections were made by S&A scenics - I got them last year then moved house, so they have only just had their first combat outing...


Wednesday, 29 December 2021

US M5 High speed tractor - model redeemed

 Some while ago I bought a few US M4 high speed tractors from Heroics & Ros.  Whilst most of the castings were OK, one had suffered in the mould and was not going to be "table worthy".  It was bent to the left and the cabin area was only about 2/3 of the required height.


The model nearest the camera is the donor vehicle.  As the running gear was in better condition and height than the bodywork, I decided to create a M5, adding a cabin and reducing the rear deck.  Then it got put in a drawer until this Christmas, when I thought I'd have a go at rescuing it and finishing the model.

Here's the US M4, M5 & M6.


Here's reference photos for the cab.


Suitably armed with a plan, I removed all the bits I did not want and filed down the rear deck and around the sides.


This was then boxed off.


I added the cabin, the rear deck, the rear overhang for the engine radiator, tools, MG mount & cover, front bonnet and fender.  I added the prominent side bars to each side of the running gear.  Sorry, too busy making to photo each stage!


I also bent the legs on a 105mm Howitzer and added a stowage box so the tractor has a load to pull.


Most of my artillery will be truck towed, but as I had the model anyway, I thought I might as well try to make use of it!

As ever, I hope that this inspires you to have a go at making your own.


Friday, 24 December 2021

Handley Page O/400 in 1/600

This week I went to the Leeds club (my new local) and played "Chocks Away!" - a WW1 very simple game that I came up with a few years ago for my tiny Tumbling Dice planes.  Suitably inspired by an hour or so's fun, I have started to prepare my remaining HP O/400s for battle.  Here goes....

The Tumbling dice kit.  Usually, with Tumbling Dice, you get the plane as one casting, or two if it has non-retractable wheels.  Here you get the body/lower wing, upper wing, 2 x engines, 2 x wheels (+ spare) and a tail.  This is the casting, wire brushed, holes drilled and one central spar added.

I drilled out two holes at the outside of the wings - all the way through the lower wing and a good way into the upper wing, to receive a pair of struts each side.


I drilled 4 holes on the fuselage to accept a bent staple strut, which will provide a secure way of attaching the wing.  One paperclip glued in, one to go....


I glued a strip of plastic on the outer side of the engine to represent the prominent tube radiators.  

I glued the two engines to the lower wing, checking that they are parallel to the fuselage and at the same height above the wing.


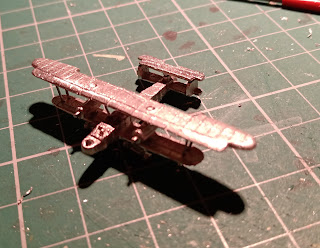
Once I attached the top wing to the two engine mountings and the two staple based struts over the fuselage, I turned the plane upside down and threaded staples through to be wing struts.  The plane should be sturdy enough that these additions are cosmetic only.  Doing this from the bottom, into the part-holes previously drilled into the top wing underside means that the trimming and filling is only needed on the bottom of the plane.  

I attached the two sets of wheels and re-inforced these with some off-cuts of plastic to secure the wheels to the plane.  As it will "fly" on a stand, the undercarriage is cosmetic - but I still want it to be sturdy.


The next step was to add the top tail plane at the rear, like this - 


The final step was to add guns.  The HP O/400 had two x Lewis in front of the pilot (ring mount), 1 ventral gun (not modelled - I'm not sure where the hatch even was!) and two guns in the rear dorsal position.  These seem to have been mounted to give cover to 180 degrees but this was done separately, at the corners of the rear dorsal station.   I decided not to model the front guns as they are likely to get broken off - but I may rethink that and add some later.

Guns added:

Finished!  The prominent gaps in the top wing around the engine mounts will be sorted out as part of the painting process.

In real life, the O type bombers were mainly used at night, but as this is just a knock-about simple game, I'm happy to have them operating in daylight.

As ever, I hope this inspires you to get some of these and have a go - they are quite quick to make and very satisfying once completed.